Full-screen test patterns and a step-by-step guide for monitors, phones and tablets: dead pixels, burn-in, backlight bleed, uneven brightness, touch and motion. Everything runs in your browser and nothing is uploaded.
Compare the resolution with the monitor's specification: if it is lower, the monitor is not running at its native resolution and text looks soft. The refresh rate is measured in this tab and can read low on battery saver or in a background tab.
Galaxy phones can run below the panel's highest resolution (Settings > Display > Screen resolution); the readout shows the current setting. The refresh rate can read 60 Hz when motion smoothness is set to Standard or power saving is on.
Before you start
Warm it up. Leave the monitor on for about 10 minutes. Brightness and colour settle once the panel is warm.
Reset the picture. In the monitor's own menu, choose the standard picture mode, turn off eye-saver (low blue light) and dynamic contrast, and leave brightness where you normally use it.
Use the native resolution. Set the browser zoom to 100% with Ctrl+0 and move this window to the monitor you are testing.
Wipe the screen gently with a dry microfibre cloth, so dust is not mistaken for a dead pixel.
Dim the room for the black screen, without making it pitch dark.
Set brightness by hand. Turn off adaptive brightness and set it to about half; some tests ask for full or 10%.
Plain colours. Turn off Eye comfort shield (or Night Light), and on a Galaxy choose the Natural screen mode.
Keep it awake. The page asks the phone not to sleep during a test; if it still dims, lengthen the screen timeout.
Wipe the screen and, if you can, take the phone out of its case so the edges show.
Hold it upright and tap a start button. Chrome on Android hides the status and navigation bars, so those strips get checked too.
Inside a test, tap for the next screen. A tap on the last screen, or the phone's back gesture, leaves the test.
Inside a test: click, Space or → for the next screen, ← for the previous one, Esc to leave. The pointer hides itself after a moment.
The tests
01
Dead and stuck pixels
Look across the whole screen on each colour from about 50 cm, then closer along the edges and corners.
Look across the whole screen on each colour at reading distance, then closely along the edges, the corners and around the camera hole.
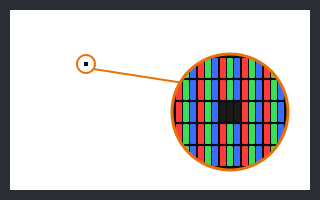
Dead pixel: a dot that stays dark on the white screen.
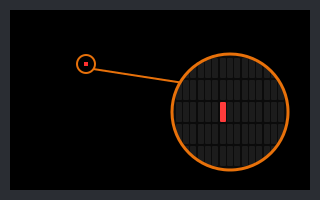
Stuck pixel: a dot that stays red, green or blue. It stands out on black and on the colours it does not belong to.
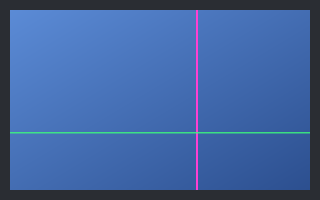
Line: a thin line across the whole screen points to a panel or cable fault, which is more serious than one pixel.
Dust or a pixel? Dust looks soft and moves with your viewing angle; a pixel fault is a sharp square that stays put.
Dead pixel on white (magnified)Stuck pixel on black (magnified)A line across the panel
02
Burn-in and image retention
OLED screens, which most phones use, wear where the same image stays for hours. Turn brightness to full for this test and look for faint shapes that should not be there.
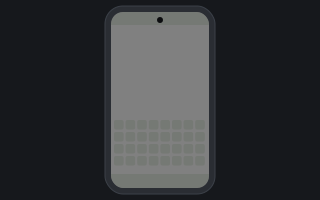
Status and navigation bars: a faint strip or icons along the top or bottom edge, clearest on grey.
Keyboard and app layouts: the outline of keys or of a much-used app in the lower half.
Colour shift: on white, worn areas look slightly yellow or pink compared with the rest.
Retention or burn-in? Retention fades within minutes of showing something else; burn-in stays.
Faint status bar and keyboard shapes on grey
03
Low brightness and near-black
Turn brightness down to about 10% in a dim room. OLED faults that a bright screen hides show up here.
Graininess: a fine, sandy texture. A little is normal for OLED at very low brightness; blotches you can see at arm's length are not.
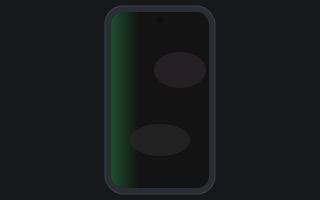
Tint: parts of the dark grey look green or pink, often along one edge.
Black crush: the darkest grey looks like pure black, or the dark greys jump in steps.
Green tint and blotches on dark grey (exaggerated)
02
Backlight bleed and glow
Use the black screen in a dim room at your normal brightness, not at maximum. Look from straight in front, then move your head a little.
Bleed: bright patches along an edge or in a corner that stay in place when you move your head.
Glow: a haze that shifts or grows as your viewing angle changes. Some glow is normal for LCD panels, especially IPS; VA panels usually show less.
Clouding: blotchy lighter areas across the black.
Corner bleed on a black screenClouding on a black screen
03
Uniformity and tint
Mid and dark greys reveal differences that white and black hide.
Uneven brightness: a corner or band that is clearly darker than the centre. A slight fall-off towards the edges is normal.
Tint patches: areas that look pinkish, yellowish or greenish compared with the rest.
Pressure marks and smudges: ripples, spots or a dirty-looking patch that is not on the glass.
Image retention: a faint ghost of a taskbar or window. On LCDs it normally fades within minutes.
Dark corners and a tinted patch on grey
04
Gradients and banding
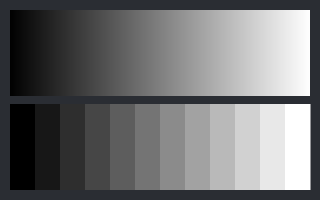
Each ramp has all 256 levels from dark to bright. It should look smooth.
Banding: visible steps or stripes in a ramp.
Colour cast: the grey ramp turning greenish or pinkish in places.
Not always the panel: graphics-card colour settings, a non-native mode or a cheap cable adapter can cause banding too. If in doubt, compare with another monitor on the same computer.
Smooth ramp (top) and banded ramp (bottom)
05
Sharpness and native resolution
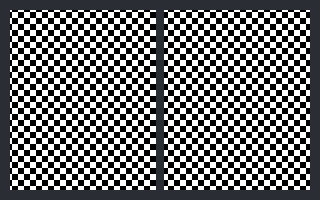
These patterns are drawn one panel pixel at a time, whatever the Windows scaling. At the native resolution they look like flat, even grey from a normal distance and a crisp fine grid close up.
Waves, stripes or blur mean the picture is being scaled: check the resolution above, the browser zoom, or the monitor's sharpness setting.
Text: the last screen shows text at several sizes. Small text should be readable without colour fringes.
Pixel density: a 27-inch Full HD screen has about 82 pixels per inch, so text is softer than on a 24-inch Full HD or 27-inch QHD screen. That is normal, not a fault.
Crisp pattern (left) and scaled pattern (right)
05
Touch across the whole screen
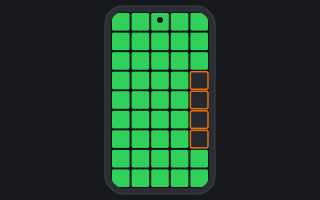
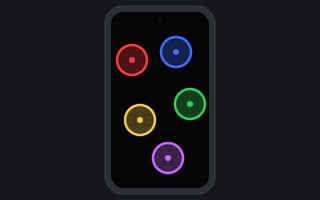
The screen turns into a grid. Slide a finger over every cell until all of them are filled; the counter shows how many are left.
Dead zone: cells that never fill, usually in a strip or a corner. Go over them slowly once more before calling it a fault.
Edges: run along every edge and corner too; curved edges and replaced screens tend to fail there first.
To finish: once every cell is filled, tap anywhere, or use the back gesture at any time. The result is written into the note below.
A grid with a strip that never registered
06
Multi-touch and ghost touch
Each finger on the screen draws a circle. Add fingers one at a time; the top of the screen shows how many registered at once.
Fingers at once: phones and tablets normally track at least five. Fewer, or circles that jump about, point to a touch-panel fault.
Ghost touch: lift every finger and leave the phone untouched for 30 seconds. No circle should appear and the touch count should not rise.
To finish: use the phone's back gesture.
Five fingers registered at once
06
Motion and refresh rate
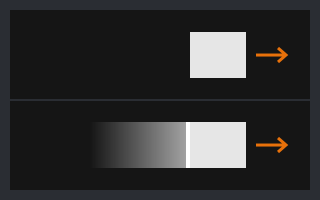
Blocks cross the screen at a constant speed on dark, mid and light backgrounds. The measured refresh rate is shown in the corner.
Ghosting: a long smeared trail behind a block. VA panels often smear more on the dark background; that is typical, but compare it with the other two lanes.
Overshoot: a bright or dark outline that the block drags behind it, usually from the monitor's highest overdrive setting.
Judder: jumps instead of smooth movement. Check the refresh rate and close heavy programs.
A clean edge (top) and a ghosting trail (bottom)
07
Body, buttons and ports
No test screen for this one: check the device itself.
Scratches: switch the screen off and look at an angle with a window or lamp reflected in it. Scuffs on the coating show only this way.
Buttons and menu: every button works, and the monitor's information menu shows the expected resolution and refresh rate.
Ports: each input gives a picture with your cable.
Stand and casing: adjustments hold, nothing wobbles or rattles, and there are no cracks.
Noise: no buzzing or high-pitched whine at your normal brightness.
Rear label: the model and manufacture date match what you were told.
Glass: with the screen off, tilt it under a light to find scratches and hairline cracks, especially at the corners.
Gaps and lifting: the screen should sit flush with the frame. A gap or a bulging screen can mean a swollen battery; stop using the phone.
Screen protector: bubbles or cracks in a protector are not the screen's. Lift a corner only if the owner agrees.
Fingerprint sensor: on phones with one under the screen, test it; a cracked or replaced screen often breaks it.
Buttons and sensors: the volume and side keys work, and the screen turns off when you cover the top during a call (proximity sensor).
A scratch shows in a reflection on the switched-off screen
Advanced: read the manufacture date on Windows
A monitor reports its model and manufacture year and week to the computer. With it connected, run this in Windows PowerShell:
A phone camera sees a screen differently from your eyes. These settings keep photos honest, so buyers trust them and nobody is surprised at pickup.
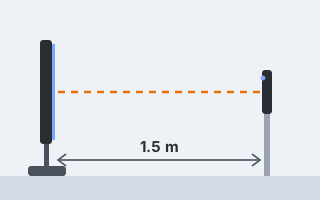
Straight on, about 1.5 m away, with the screen filling most of the frame and the phone level with its centre.
Lock focus and exposure by pressing and holding on the screen in the camera app. On the black screen, lower the exposure until it looks as dark as it does to your eyes; auto exposure makes glow look far worse.
Avoid close-ups unless you are showing a specific flaw. Close shots add rainbow ripples (moiré) that are not on the screen.
Add one unedited video of 20 to 30 seconds stepping through the test screens. One continuous take is more convincing than separate photos.
Phone straight in front, level with the centre of the screen
Photograph the phone with another phone or a camera, straight on, with the screen filling most of the frame. Lock the exposure and keep lamps from reflecting in the glass.
A good set of photos
The 50% grey screen at full brightness: the photo buyers look at for burn-in
The white screen
A screenshot of the finished touch grid (side key and volume down)
The screen switched off, tilted under a light, for scratches
The four corners and edges of the glass
Settings > About phone showing the model; cover the serial number and IMEI
Switched on with an ordinary wallpaper, from a slight angle
White screen
Black screen in a dim room
50% grey screen
Red, green and blue screens (one collage)
The monitor's information menu showing resolution and refresh rate
Screen switched off, at an angle with a reflection
Rear label with model and date; cover the serial number
Stand, back and ports
Accessories: power adapter and cables
At a pickup, ask the seller to open this page on the phone itself and run the touch grid. It takes about a minute.
At a pickup, open this page on a laptop and let the buyer run test 1. It takes 30 seconds and settles most questions on the spot.
Your results
Mark each test above. The summary below updates as you go and can be pasted into a listing or a message. Your marks stay in this browser only.